I recently upgraded my Android toolchain to the official Android Studio 1.0. I’ve set up a new project, and as with any Android app, included Robolectric to allow for easy unit testing. I was able to configure Gradle build to execute the tests fairly easily using existing documentation on Robolectric project. To my surprise however, I wasn’t able to launch unit tests using the standard IntelliJ JUnit run configuration. This post details my workaround, hopefully temporary until Google fixes the issue in Android Studio.
To start, create a JUnit configuration, as detailed on the Jetbrains site. If you run it now, you’ll face “!!! JUnit version 3.8 or later expected” error. This occurs no matter which JUnit dependency you define in your Gradle file, as Android bundles an earlier version that gets precedence in the classpath. The solution in the past was to move the JUnit dependency in the project configuration or *.iml file up above the Android SDK. This is no longer an option in Android Studio 1.0. So the remaining solution is to modify the classpath used by the run configuration.
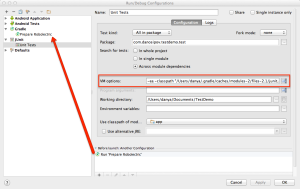
In order to do that, copy the run command that was used to launch JUnit tests. It is the first line of output when you run the JUnit run configuration. Get rid of everything except -classpath "..." argument. The argument value is a colon-separated (:) list of files and directories where java looks for classes. In this value, locate the JUnit dependency (either junit, or junit-dep), and make it the first path in the list. Now paste this new argument in the “VM Options” field of JUnit run configuration.

We’re still not done, as running now will result in java not finding the class file for your test. To resolve this, create a new Gradle run configuration. Point it to your app, and enter testDebugClasses. Call it something memorable (I named it “Prepare Robolectric”), and go back to JUnit run configuration. In the “Before Launch” list add Another Action, and choose the Gradle task.
The Gradle task will compile test sources required for JUnit, and place them in app/build/test-classes/. The last step is to add the absolute path to this directory to the classpath in the JUnit configuration (at the end of the list). You should now be able to run unit tests right from Android Studio.
This presentation was very helpful in configuring Android Studio to run tests. Refer to it for more information and visual screenshots. If you have a better way of configuring unit tests, I’d love to hear it!
Matt Rein
I’ve had a good deal of success moving all my robolectric tests to a separate module within my project. Once I’ve done that, the JUnit tool inside Android Studio seemed to work without much modification if I recall correctly. Most of the details on what we did to set it up are here: https://engineering.aweber.com/avoiding-robolectric-shock-while-testing-android-with-gradle-and-espresso/