From what I’ve seen, vast majority of bugs and crashes programmers face on Android are around state and concurrency. These issues cause serious headaches not only in mobile applications, but they have a special flavor in Android. Specifically, all long running operations (network calls, file access, etc) must be done off the main (UI) thread. Once taken off the main thread, one needs to set up communication between UI and background threads to signal operation progress and communicate results. This is further complicated by device state changes of the application outside the programmer control. As an example, a rotation triggers a rebuild of the Activity, so if there were a thread running in the background, its launcher UI may no longer be there. Incorrect handling can be a cause of memory leaks or crashes.
Recent additions to Android, for example Fragments and Loaders, attempt to resolve some of these issues, but either fall short or bring their own problems. Just as an example, my original plan for this demo app was to use a Loader, but because I wanted to keep track of the download progress I had to fall back to using traditional threads.
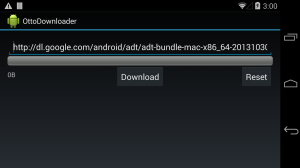
This blog series will attempt to demonstrate some alternative ways of setting up asynchronous communication between Android components. The example application is a simple download helper. It accepts the URL of the file to download, and shows a progress bar. Download can be paused, resumed, or reset (to demonstrate two way communication). Complete source code can be found on github. Feel free to clone it, and run in Android Studio.
To be clear, this is not a tutorial on how to create a download application! If that’s your task, I would look at Services with an AsyncTask for the actual download (reminder: Service, although running in the background, still runs in the UI thread, that you never block!) Instead I’ll concentrate on the message passing aspect of an Android application.
In the first part I will use a message bus to handle all communication. For that we’ll make use of a Square library Otto. To be fair, the example takes it to an extreme in order to push all communication to be event driven and as asynchronous as possible, including handling touch events on the button. Otto bus really excels at communication between different view components, where an alternative would be either view traversal (tedious, and tough to evolve), or callback interface implementation (safe, but verbose). One example is communicating between different fragments, where an action in one should trigger a change in another. For this application Otto is not the best fit (its actually synchronous), but still a good introduction to the concept of an event driven application.
Let’s walk through the demo application:
DownloadApplication: Subclasses standard Android application class, and provides access to a global Otto bus.
DownloadActivity: Contains both the main Activity and the Fragment. The Activity is used only as a container for the Fragment, majority of the work is handled by the Fragment.
Downloader: Subclasses a Java Thread, implementing the run() method to perform the file download.
There are also a few classes in the events package, but they’re relatively straightforward.
Let’s start with the Downloader – it takes a URL to download, and a callback interface.
public Downloader(String url, DownloadProgressReport reportCallback) {
    this.url = url;
    callback = reportCallback;
}
It would be nice to generate events directly from here, but doing so fails with an Otto exception due to attempts to access a bus pinned to the Android main thread (see more details below). The actual code to perform download is very standard for Java – we create a bogus file in /sdcard, and copy bytes from the InputStream into the FileOutputStream.
URL toDownload = new URL(url);
HttpURLConnection urlConnection = (HttpURLConnection) toDownload.openConnection();

urlConnection.setRequestMethod("GET");
urlConnection.connect();

// We don't care about the downloaded file, just store it anywhere
File sdCardRoot = Environment.getExternalStorageDirectory();
File outFile = new File(sdCardRoot, "outfile");
FileOutputStream fileOutput = new FileOutputStream(outFile);

InputStream inputStream = urlConnection.getInputStream();
totalSize = urlConnection.getContentLength();
loadedSize = 0;

byte[] buffer = new byte[1024];
int bufferLength = 0; //used to store a temporary size of the buffer
while (!killed && (bufferLength = inputStream.read(buffer)) > 0) {
       while(!running && !killed) {
            Thread.sleep(500);
       }
       if (!killed) {
            fileOutput.write(buffer, 0, bufferLength);
            loadedSize += bufferLength;
            reportProgress();
       }
}
On each iteration we call a progress callback with the number of bytes we have downloaded and total bytes for the file.
private void reportProgress() {
    callback.reportProgress(loadedSize, totalSize);
}
DownloaderFragment takes care of the view. In the onCreate method it registers itself to the Bus.
@Override
public void onCreate(Bundle savedInstanceState) {
     getEventBus().register(this);
     super.onCreate(savedInstanceState);
}
Methods annotated with @Subscribe annotation then receive the corresponding events. All buttons are configured to post events to the bus upon a click – center button changes behavior depending on the download state, and the OnClickListener gets swapped out accordingly.
@Subscribe
public void answerDownloadPause(DownloadPauseEvent event) {
     downloadThread.pause(true);
     switchToResume(((Button) event.getView()));
}

private void switchToResume(Button downloadButton) {
     downloadButton.setText(getString(R.string.resume));
     downloadButton.setOnClickListener(handleResume);
}
The answerDownloadStart kicks off the download by instantiating a new download thread and starting it. Besides the URL, it provides a callback class that posts appropriate events to the Bus from the thread.
@Subscribe
public void answerDownloadStart(DownloadStartEvent event) {
      downloadThread = new Downloader(
          urlEditText.getText().toString(),
          new Downloader.DownloadProgressReport() {

          @Override
          public void reportProgress(final long loaded, final long total) {
               final Activity activity = getActivity();
               if (activity != null) {
                   activity.runOnUiThread(new Runnable() {
                        @Override
                        public void run() {
                            ((DownloadApplication) activity.getApplication()).getBus()
                                    .post(new DownloadProgressEvent(loaded, total));
                        }
                    });
                }
          }

          @Override
          public void reset() {
               final Activity activity = getActivity();
               if (activity != null) {
                   activity.runOnUiThread(new Runnable() {
                       @Override
                       public void run() {
                            switchToDownload(((Button) getView().findViewById(R.id.downloadButton)));
                       }
                   });
               }
          }
      });
      downloadThread.start();
      switchToPause(((Button) event.getView()));
}
Note: It is possible to initialize the bus with new Bus(ThreadEnforcer.ANY). This would allow events to be posted from any thread. But they would be consumed on the same thread, so any attempts to update the views would result in a runtime exception (they can only be modified by the UI thread). Hence, the default way to instantiate an Otto bus is the safest.
We also take precaution to check the activity not to be null prior to posting Runnables to run on UI thread. If a device is rotated, the original Activity is no longer there – in fact, there may be a period when the Fragment is in a detached state, and the attempt to call its Activity would fail with a NullPointerException.
If you run the app on your device, you may hit some performance issues – the interface may lag. Otto bus doesn’t allow dropping of events, and every one is processed. In addition, garbage collection is triggered often, as every progress report is a new object. Finally, all the view updates all taking place on the UI thread. We will see some ways to control the message flow in the next installment.
To summarize:
- Otto library lacks ability to control message flow.
- Thread enforcement is left up to the programmer.
- Works best for communication between Fragments or other views
In the next installment we’ll take a look at RxJava, and how it can be used to drive the same app.


